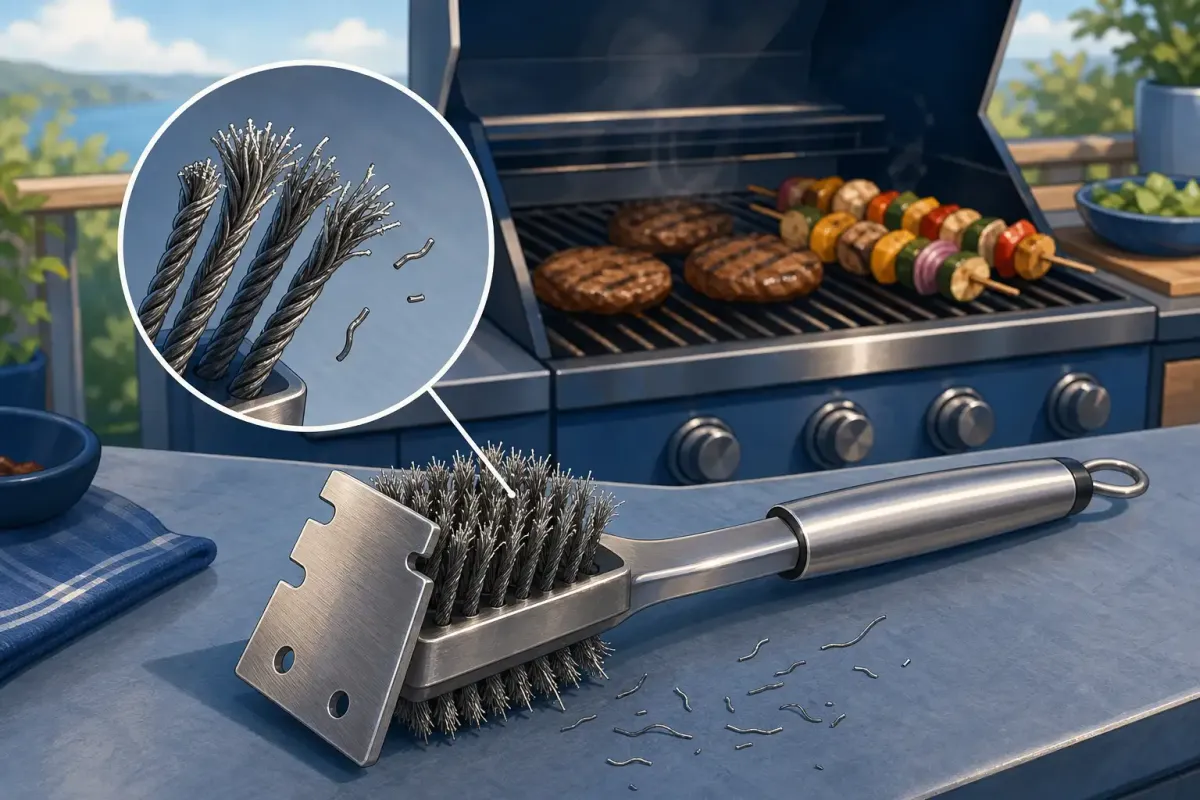
If you’ve got a wire grill brush hanging next to your barbecue, check the brand. You might be holding one of the 1.7 million brushes the Consumer Product Safety Commission recalled in early 2026 — and keeping it around isn’t worth the gamble.
Here’s the problem nobody talks about at cookouts: those tiny metal bristles break off while you’re scraping the grates. They’re nearly invisible against a black cooking surface. Next time you throw on burgers, a bristle sticks to the food, someone swallows it, and the evening ends in an emergency room instead of the backyard. Consumer Reports found that one in four people injured by wire grill brush bristles had to be admitted to the hospital. Some needed surgery to remove the metal from their throat or intestines.
The recalls this year were massive. Conair pulled over a million Cuisinart-branded brushes. Weber issued its own recall. Between them, brushes sold as far back as 2009 got flagged — meaning millions of households still have dangerous brushes sitting in their grill caddy right now.
So yes, you should toss the wire brush. But you still need to clean your grill. And not just for the sake of better-tasting food.
A Dirty Grill Is a Fire Waiting to Happen
The National Fire Protection Association tracks grill fires every year, and the numbers are not small. U.S. fire departments respond to roughly 10,600 home fires involving grills annually. Gas grills alone account for more than 9,200 of those. July is the single worst month.
What causes most of these fires? It’s not faulty propane tanks or charcoal mishandling. The NFPA points to failure to clean as a leading factor. Grease builds up on the grates, drips into the firebox, and accumulates in the grease trap. Eventually that layer of old fat becomes fuel. All it takes is one flare-up and you’ve lost control of the fire.
There’s a secondary problem too. The same grease that creates a fire hazard also ruins your food. Old carbonized gunk on the grates makes everything taste like last month’s fish and causes sticking that tears apart delicate proteins. A dirty grill cooks unevenly because the grates can’t transfer heat properly through that layer of crud.
The good news: none of this is hard to fix. You just need the right tools and a routine that doesn’t feel like a chore.
What to Use Instead of a Wire Brush
The market has moved on from wire bristles, and the alternatives actually work better in a lot of cases. Here are the best options, ranked from cheapest to most specialized.
Aluminum foil and tongs. Crumple a sheet of heavy-duty aluminum foil into a tight ball, grip it with your tongs, and scrub the hot grates. The foil molds to the shape of the grates as you push, getting into grooves a stiff brush skips over. It costs nothing and you already have it in your kitchen. The Kitchn tested five different grate-cleaning methods and declared the foil-ball approach the winner — especially when paired with a paste of baking soda and dish soap for deep cleans.
Nylon and coil brushes. These look like traditional brushes but use heat-resistant nylon bristles or coiled metal springs instead of individual wire bristles. Nothing breaks off because nothing is designed to break. They’re widely available at hardware stores and cost $8 to $20. Look for models with a long handle so you’re not leaning over a hot grill. One thing to know: nylon bristles will melt if you leave the brush resting on a hot grate, so keep it moving or set it aside between passes.
Grill stones and pumice blocks. A pumice-style grill cleaner works like an eraser — you rub it across hot grates and it wears down instead of shedding dangerous fragments. These run about $10 and last a full season. The downside is they’re messier. You’ll get some pumice dust, so give the grates a quick wipe with oil afterward.
Wooden scrapers. A hardwood paddle develops grooves that match your specific grates over the first few uses, creating a custom-fit scraper. It won’t last forever — you’ll replace it every season or two — but it costs around $15 and there’s zero risk of anything ending up in your food.
The onion trick. Cut an onion in half, stick a fork in the rounded side, and rub the cut face across hot grates. The steam and natural acids loosen residue while the onion fibers scrub. It works surprisingly well for quick between-use cleaning, and it costs about fifty cents. The main drawback is you’re sacrificing an onion you could’ve put on a burger.
How to Deep Clean a Grill (the Real Way)
Light scraping before each cook keeps things manageable, but once or twice a summer you need to actually get in there and clean the whole machine. Here’s the method that takes about 45 minutes and resets your grill to near-new condition.
Step 1: Burn it off. Close the lid, crank all burners to high, and let the grill run for 15 to 20 minutes. This incinerates most of the food residue on the grates and loosens whatever’s left. For charcoal grills, light a full chimney and let it burn hot with the lid closed.
Step 2: Scrape while hot. After the burn-off, kill the heat but don’t wait for the grates to cool. Hot grates release gunk way easier than cold ones. Use your foil ball, nylon brush, or grill stone to scrape every bar thoroughly. Work in sections and don’t rush this part.
Step 3: Pull the grates and soak if needed. If they’re really bad — years of neglect, thick carbon buildup — remove the grates and soak them in a large bin or utility sink with hot water and a few tablespoons of dish soap. Let them sit 20 minutes, then scrub with the baking soda paste (equal parts baking soda and water mixed to a toothpaste consistency). Rinse thoroughly and dry with a towel.
Step 4: Clean the firebox and grease trap. This is where most people stop — and it’s the most important step for fire prevention. Scrape the inside walls of the grill with a putty knife or plastic scraper to remove accumulated grease and carbon. Pull out the grease tray or cup underneath and dump it. If it’s crusted solid, soak it in hot soapy water. For charcoal grills, dump all the old ash. Ash holds moisture and accelerates rust.
Step 5: Clean the burners (gas grills). Check the burner tubes for clogs. Spider webs, grease, and debris can block the tiny gas ports, which causes uneven flames and potential flare-ups. Use a thin wire or a dedicated burner cleaning tool to clear each port. Don’t skip this — blocked burners are a leading cause of gas grill fires.
Step 6: Wipe down and reassemble. Wipe the exterior with a damp cloth and mild cleaner. Reassemble everything, run the grill on high for five minutes to evaporate any remaining moisture, then lightly oil the grates with a paper towel dipped in vegetable oil and held with tongs.
The Daily Habit That Prevents the Deep Clean
If you do one thing after every grilling session, make it this: scrape the grates immediately after cooking while they’re still blazing hot, then close the lid and let the grill run on high for five minutes. The heat burns off whatever you missed and dries the grates so nothing sticks overnight.
The second habit: empty the grease trap or ash catcher every three to five cooks, not when it’s overflowing. A full grease tray is a firebomb sitting directly under your burners.
Together these two habits take less than seven minutes and eliminate the need for most deep cleans. Your grill stays ready, your food tastes cleaner, and your fire risk drops dramatically.
Two Grill Cleaning Mistakes That Make Everything Worse
Before you head outside: a couple of things people do with good intentions that backfire.
Using oven cleaner on grill grates. Oven cleaner is designed for enameled oven interiors, not the cooking surface you put food directly on. The chemicals are caustic, they leave a residue that’s nearly impossible to rinse off completely, and they can damage the finish on porcelain-coated grates. Stick to baking soda, dish soap, and heat.
Soaking cast iron grates overnight. Cast iron grates need moisture to be rinsed off quickly and thoroughly dried. Leave them in a bucket of water overnight and you’ll wake up to rust. If you soak cast iron, keep it short — 20 minutes max — then dry them immediately and re-season with a thin coat of oil while they’re still warm.
A Quick Note on Grill Placement
While we’re talking safety: the NFPA says roughly one in four grill structure fires started because the grill was too close to the house, deck railing, or eaves. Ten feet of clearance is the recommended minimum. If your grill currently lives right next to the siding because that’s where the patio door is, move it. Not tomorrow. Today.
The wire brush recalls were a wake-up call, but the real takeaway is bigger than one product category. Grill maintenance isn’t just about flavor or longevity — it’s a safety issue that most people treat as optional until something goes wrong. Throw out the wire brush. Spend ten bucks on a coil brush or just grab the foil from your kitchen drawer. Get in the habit of scraping hot and watching your grease trap. Your burgers will taste better, and nobody’s dinner will end with a trip to the ER.
Discussion
Comments
Share a helpful tip, question, or takeaway from That Wire Grill Brush Could Send Someone to the ER — Here's What to Use Instead.
0 Comments
Loading comments…