Most pantry organization advice sounds like: buy these matching containers, arrange them by color, take a photo for Instagram. That looks great for a week. Then the crackers get shoved behind the pasta, the expired cans multiply, and you are back to digging through the same mess.
The difference between a pantry that stays organized and one that lasts three days comes down to systems, not aesthetics. Here is a practical framework built around how people actually use their kitchens.
Why Pantries Fall Apart So Fast
The root cause is almost never laziness. It is a lack of structure. When there is no designated spot for every item, things land wherever there is space. Over weeks, that randomness compounds.
Research from the National Resources Defense Council estimates that organized pantry systems can reduce food waste by up to 25 percent. The average American household throws out roughly $1,500 worth of expired or spoiled food each year, according to USDA data. A working organization system cuts that number by making inventory visible.
There is also a financial cost to disorganization beyond wasted food. When you can not see what you have, you buy duplicates. A 2023 survey by the National Grocery Association found that 38 percent of shoppers admitted to buying items they already had at home because they could not find them in their pantry or kitchen. That adds up fast when you are buying cans of tomato sauce or boxes of pasta you did not need.
Step 1: Empty Everything and Sort Into Zones
Pull every item out of the pantry. Toss anything expired, and set aside duplicates. What you have left gets sorted into zones based on how and when you use it.
The most practical zone layout for a standard pantry:
- Daily use zone (eye level, easiest reach): cereals, snacks, bread, coffee, items the kids grab without asking
- Cooking zone (one shelf or section): oils, spices, vinegars, sauces, canned tomatoes, broths
- Baking zone: flour, sugar, baking powder, chocolate chips, sprinkles
- Bulk storage (top or bottom shelf): rice, pasta, canned goods in multiples, paper towels
- Miscellaneous (back corners, less accessible): specialty items, backup supplies, party platters
The zone layout matters because it maps to behavior. You reach for coffee every morning, so it goes at eye level. You need flour twice a month, so it goes on a less prime shelf.
Measure your shelves before buying any containers. Standard pantry shelves are 12 to 16 inches deep. Deep shelves that are 18 inches or more create a black hole in the back where items disappear permanently. If your shelves are that deep, consider adding pull-out bins or shelf risers to create a second usable layer.
Step 2: Choose Containers That Match the Job
Not everything needs a container. Over-containerizing is the second most common pantry mistake after having no system at all.
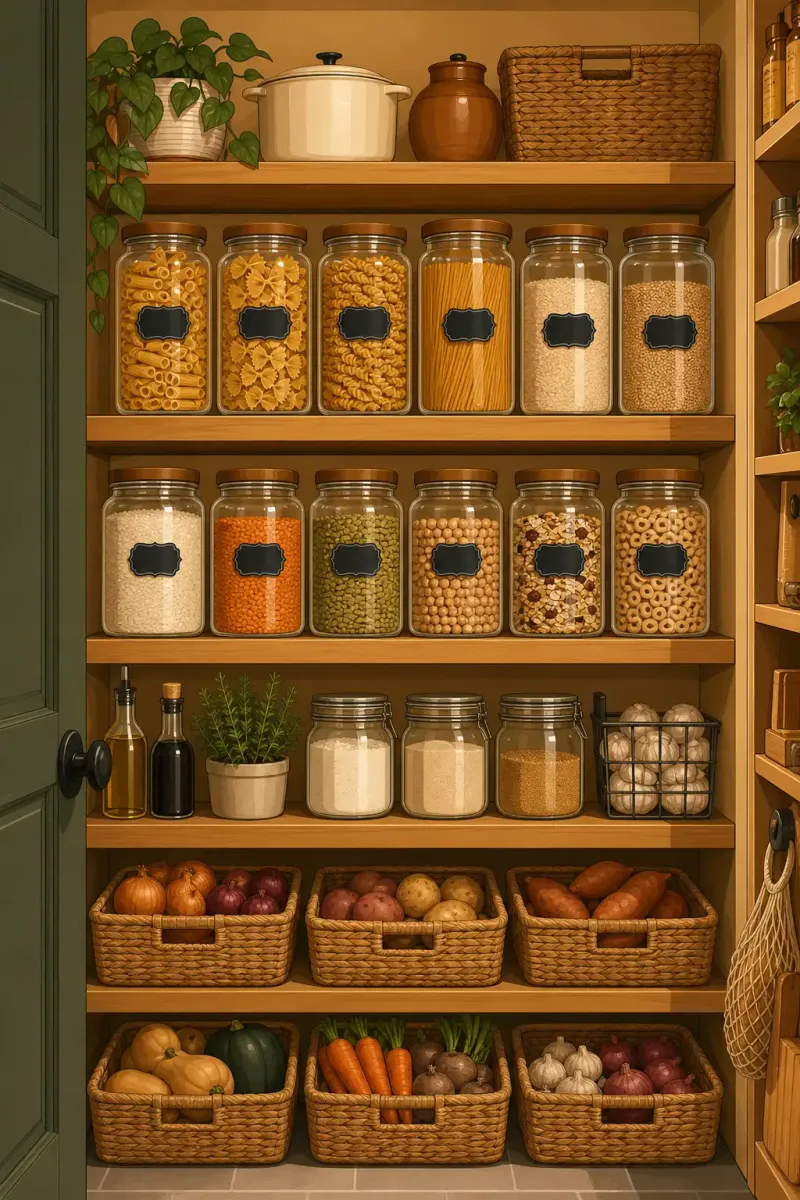
Use clear, airtight containers for:
- Flour and sugar (keeps out moisture, prevents clumping and pantry moth eggs)
- Open bags of chips, crackers, cereal (prevents staleness)
- Loose items like granola, trail mix, or bulk nuts
- Grains and dry pasta in loose packaging (keeps everything visible and fresh)
Keep original packaging for:
- Canned goods (labels contain expiration dates and nutrition info)
- Spice jars (pre-made containers usually stack better than transfers)
- Bottles and jars with screw tops
- Specialty items you use rarely (no point buying a container for something that sits there for two years)
The key rule: if the package is resealable and easy to pour from, leave it alone. If it is a flimsy bag that always rips or a box that tears open weirdly, transfer it. The goal is reducing friction, not creating a museum display.
Container sizes should match the shelf depth. A 2-quart container fits most 12-inch shelves without wasted space behind it. Stackable square or rectangular containers use space more efficiently than round ones, though round containers are easier to grab and pour from.
When buying containers, start small. Buy three or four for the most disorganized areas first. You can always add more later once you see which zones actually need them.
Step 3: Label Everything You Can
Labels are not decoration. They are instructions for every person who opens the pantry. When the baking zone has a container labeled “ALL-PURPOSE FLOUR,” nobody puts the brown sugar in there by accident.
Three labeling approaches that work:
- Chalk labels on containers: Wipe clean when contents change. Good for containers you reuse for different items.
- Label maker tape: Clean, professional, sticks well. Best for a system you plan to keep stable for months.
- Masking tape and marker: Fast, cheap, easy to replace. Works fine for households where function beats form.
The label should go on the front of the container at eye level. One word, all caps if possible. “CEREAL” beats “Honey Nut Cheerios and Other Breakfast Grains.”
For household members who are not reading yet, picture labels work well. Print or draw a small image of the item and stick it next to the text label. This is especially useful in households with young children who are learning to put things back where they found them.
Step 4: Apply the FIFO Method
First in, first out. This is how restaurants manage inventory, and it works in home kitchens too.
When you buy new canned tomatoes, put them behind the existing ones. When you buy a new bag of rice, slide it behind the old bag. Every time you restock, the older items move to the front where they get used first.
This one habit alone cuts down on expired cans hiding in the back of the shelf. It takes ten seconds per restock and saves you from discovering a can of beans from 2019 when you are in the middle of cooking dinner.
To make FIFO easier, store duplicate items in a clear bin or tray that pulls out like a drawer. When you restock, slide the bin forward, put new items in the back, and push it back. The oldest items are always in front.
Step 5: Use Lazy Susans for Corners and Tight Spots
Lazy susans are one of the few organization products that actually earn their cost. They turn dead corner space into usable storage and let you reach items without moving everything else.
Best uses for lazy susans in a pantry:
- Oils and vinegars (spin to find what you need without knocking over bottles)
- Condiments and sauces
- Spice collection (for larger spice containers that do not fit a rack)
- Syrups and honey (prevents sticky rings on shelves)
Lazy susans can increase usable shelf space by roughly 30 percent in corner cabinets. They work best for items you reach for frequently but do not need to see all at once. For items where expiration dates matter, a flat shelf with clear containers is better because you can see everything at a glance.
Step 6: Build a Weekly 5-Minute Maintenance Routine
The system dies without maintenance. Here is what works:
Every Sunday evening (or whatever day suits you):
- Scan for items past their expiration date
- Check if anything needs restocking (write it on a list immediately)
- Move older items to the front of their zones
- Wipe down one shelf with a damp cloth (rotate which shelf each week)
This takes about five minutes. The return is a pantry that stays organized without a weekend overhaul every month.
The hardest part is building the habit. Tie it to something you already do on Sundays, like making the weekly grocery list. When you check what you need to buy, do the pantry scan at the same time.
Step 7: Make It Work for Your Household
The best system is the one your family will actually use. If your kids are the primary snack consumers, put their snacks at their eye level with clear labels. If your partner does most of the cooking, make sure the cooking zone matches their workflow.
Some practical adjustments:
- Small households: Use smaller containers. A half-full giant container looks messy and wastes shelf space.
- Households with kids: Lower the daily-use zone so children can reach their own snacks. Label with pictures if they are not reading yet.
- Frequent entertainers: Dedicate one shelf to party supplies, paper goods, and backup drinks.
- Roommates or shared kitchens: Use separate bins or labeled zones per person to prevent confusion.
Common Mistakes to Avoid
Over-labeling: You do not need a label on every single container. Label the ones that could be confused for something else, or the ones that get refilled from bulk storage.
Matching containers for everything: Matching sets look nice but are expensive and inflexible. Buy containers as you need them, and buy sizes that fit your actual shelf depth.
Ignoring the back of deep shelves: If you can not see or reach the back, items will rot there. Use pull-out bins or baskets that slide forward, or install shelf risers to create a second level.
Never editing: Once a month, do a quick purge. If you have not used it in six months and it is not a holiday-specific item, donate or toss it.
The 30-Day Reset
If your pantry is a disaster right now, do not try to organize it perfectly on day one. Here is a realistic timeline:
- Day 1: Empty everything, toss expired items, wipe shelves
- Days 2-3: Sort items into rough zones, buy containers for the most chaotic areas
- Day 4: Label the zones and containers
- Day 7: First weekly maintenance check
- Day 14: Evaluate what is working and adjust zones if needed
- Day 30: The system should feel automatic by now
Once the system is running, you will notice the difference immediately. Shopping becomes faster because you can see what you have. Cooking feels less stressful because ingredients are where you expect them. And that moment when you realize nothing in the pantry has expired in months? That is the payoff.
A pantry organization system does not need to be Instagram-perfect. It needs to be functional, easy to maintain, and forgiving when life gets busy. Start with the zones, add containers where they help, label what needs labeling, and check in once a week. That is it.
Discussion
Comments
Share a helpful tip, question, or takeaway from How to Build a Pantry Organization System That Actually Stays Clean.
0 Comments
Loading comments…